The Only Guide You Need for Next.js Forms: Server Actions, Zod & Validation (2025)
After you complete this article, you will have a solid understanding of:
- How to create and handle forms in NextJS applications
- How server actions work with forms in NextJS
- How to use useActionState hook to handle forms in NextJS
- How to preserve form state between submissions and handle errors properly
- Form validation techniques on both client and server sides
If you are building any kind of app, you will definitely need forms in your project. At first, it might seem easy to create. Just create some labels, some input elements, and let users fill them out. Once they click the button, it's all done! Well, it actually gets a bit complicated and hard to keep up with all kinds of features that forms can/should do...
First, you need to validate inputs on both the frontend and backend to prevent users from entering data in the wrong format. Then, you should display errors for specific fields when the user provides incorrect input. Finally, you need to retain the data in input fields even after form submission, so users don’t lose everything just because one field contains an error. And that's just the beginning, there’s even more to it!
There are so many libraries, best practices, and different approaches when it comes to forms. React Hook Form, Next.js forms, TanStack Form, Zod, Yup, various hooks… and the list keeps growing every day. At some point, it can start to feel overwhelming, and it's easy to get lost in all of it. But don’t worry! We’ll go through everything together, and you’ll gain the confidence you need to handle forms like a pro! We will start from the simplest form code and walk through the steps you need to follow to build production-ready code. Follow how the code evolves, and even better, you can try testing it yourself as we go.
This blog is updated regularly with the latest changes and updates in Next.js (Last updated at: December 12, 2025). But even if it weren’t updated, once you understand the underlying logic, you won’t have any trouble adapting to the small changes that come along.
Note: Even though I’m using Next.js and Zod to explain things to you, many of the concepts we discuss follow pretty much the same logic in other popular frameworks and form-validation tools as well.
Creating a Basic Form in NextJS
First, let's start with creating a basic form in NextJS.
<form>
  <input type="text" placeholder="First Name" />
  <input type="email" placeholder="Email" />
  <input type="password" placeholder="Password" />
  <button>Submit</button>
</form>
Note: I will be deleting CSS styling from the code, so that you can only see the necessary part.
Right now, our form elements are uncontrolled elements, which means we don't control or store the values that are given by users. First, we will need to control the values because eventually we're going to do some server-side actions with those values(let's say we need to save them to a database.)
The first thing we can think of to control uncontrolled elements might be using our good old friend useState.
Let's convert this component to a client component (since we can't use React hooks in server components in Next.js) and control fields.
"use client";
const [firstName, setFirstName] = useState("");
const [email, setEmail] = useState("");
const [password, setPassword] = useState("");

<form>
  <input
    type="text"
    placeholder="First Name"
    value={firstName}
    onChange={(e) => setFirstName(e.target.value)}
  />
  <input
    type="text"
    placeholder="Email"
    value={email}
    onChange={(e) => setEmail(e.target.value)}
  />
  <input
    type="password"
    placeholder="Password"
    value={password}
    onChange={(e) => setPassword(e.target.value)}
  />
  <button>Submit</button>
</form>;
This looks fine for now. But if we had more input fields (which you definitely will in real-world projects), it might seem a little bit complicated. So we can just try to make it look better with some simple changes:
const [formInputs, setFormInputs] = useState({
  firstName: "",
  email: "",
  password: "",
});

const handleChange = (e) => {
  const { name, value } = e.target;
  setFormInputs((prev) => ({ ...prev, [name]: value }));
};

<form>
  <input
    type="text"
    placeholder="First Name"
    name="firstName"
    value={formInputs.firstName}
    onChange={handleChange}
  />
  <input
    type="text"
    placeholder="Email"
    name="email"
    value={formInputs.email}
    onChange={handleChange}
  />
  <input
    type="password"
    placeholder="Password"
    name="password"
    value={formInputs.password}
    onChange={handleChange}
  />
  <button>Submit</button>
</form>;
Now, the way we control our elements looks a bit cooler.
Understanding Form States and Server Actions
Now we control our form elements. But did we actually need to create states, and connect them with input elements? Well, not really. But first, let's learn something else. Then we'll get back to this.
99% of the time, you will need to use this form data in a "server-side action", like saving to a database. And if you need to save data to your database with a POST request, the way to do it in Next.js is through Server Actions. If you don't know what server actions are, they're just regular functions. The good part is, you write them as regular JavaScript functions, but they're turned into POST HTTP methods.
Typically, to write Server Actions in Next.js, you create a separate actions.js file inside your /app directory, and you would add use server directive to the top of the file. From now on, every function you write and export from this file will essentially act like an HTTP POST endpoint. This lets you run server-side logic directly from your UI, making things like database writes, form handling, and other secure operations much easier.
Note: If you’re not very familiar with Next.js, here’s something important to avoid confusion: Adding "use server" doesn't turn a component into a "server component." To make a component a server component, you basically don't write anything since every component is a server component by default. You only add "use client" to convert a component to a client component, and add "use server" to convert a function to a "server action."
So, let's create an actions.js file inside our /app directory and then create our function. This function is just to mimic saving the form data to our database.
Inside actions.js file:
"use server";

export const saveFormDatasToDatabase = async () => {
  console.log("data is saved");
};
Using Server Actions with Forms
Now, when we submit our form, we need to invoke our server action. You might think to add this function to the form tag like this:
<form
  onSubmit={saveFormDatasToDatabase}
>
When we submit the form, the form makes a GET request and refreshes the page. But typically, what we do is prevent the default behavior of a form element by using e.preventDefault(), then make our own fetch request inside the handleSubmit function that we gave to the onSubmit handler.
But the problem is, onSubmit works on the client-side. So it expects functions that actually will work on the client. We can't just give it a function that will work on the server. The best we could do with onSubmit would be something like this:
const handleSubmit = async (e) => {
  e.preventDefault();
  await saveFormDatasToDatabase();
};
This is not what we want to do in our NextJS project. Instead, we want to use the action attribute. With NextJS 13+, the action attribute can take JavaScript functions. And, thanks to server actions, this function can work on the server side with the "use server" directive (just like we did above).
The action attribute will work even if JavaScript is disabled because it's not something that works on the client, it works on the server and gives us the chance to make a "POST" request to our server by default.
Note: So we could actually use both the action and onSubmit attributes on a form element. Action would be to make a POST request, and onSubmit would be for client-side validations or other work that will operate on the client. However, if you use both action and onSubmit, do not call e.preventDefault() inside onSubmit, as it will prevent the form from making a POST request.
Now let's use the action attribute for our server action:
<form
  action={saveFormDatasToDatabase}
>
Now let's submit our form and check the network->Fetch/XHR tab.
When we look at the headers of the request, we can clearly see we made a POST request.

Also, when we inspect the payload section, we can see that all the form data is sent as the request’s payload inside a FormData object. (To see this payload, you don’t need to make your form elements controlled, but you do need to make sure every form element has a name attribute.)
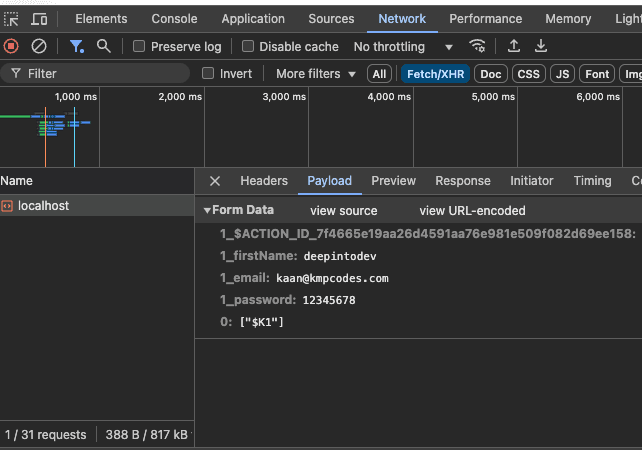
Now, we can easily get this formData object to control our values. This means we didn't actually need to use useState hook, and create states for form inputs as we did before. Because when we submit the form, we send input values anyway.
Let's remove all the state that we defined, and let's take the formData parameter from our server action so that we can access all the data when the form is submitted.
<form action={saveFormDatasToDatabase}>
  <input type="text" placeholder="First Name" name="firstName" />
  <input type="text" placeholder="Email" name="email" />
  <input type="password" placeholder="Password" name="password" />
  <button>Submit</button>
</form>
Note: We don't delete name attributes from the inputs since we'll need them for our server action.
export const saveFormDatasToDatabase = async (formData) => {
  console.log("inputs coming from the form:", formData);
};
Now, let's submit the form and see what's in our console.
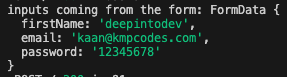
As we can see, we have our data coming from "frontend" to "backend" successfully.
Note: This formData object is not a plain JavaScript object. It has different methods. To read the data from inside a formData object, you simply do:
const rawData = {
  email: formData.get("email"),
  firstName: formData.get("firstName"),
  password: formData.get("password"),
};
Adding Form Validations
Now, we need to have more control over our inputs. We will definitely want to put some validations before we save data to our database. For example, email has to be in the right format, firstName can't be longer than 50 characters, password should at least include a letter, etc.
We ideally want this control to be in both our frontend and backend, but never only on the frontend! Client-side validations can always be manipulated, so we never trust the data coming from users.
We also want to show errors to the users if they put invalid input. And a loading state would be cool too when we're validating the data on our backend (in our server action).
There is a great hook for all this job in Next.JS, and it's called useActionState.
useActionState will take our server action and an initial state as parameters, and will return the state that came from our backend, formAction that we pass to the action attribute on our form element, and a pending state while the form is submitting. (If that sounded a bit confusing, don’t worry, just take a look at the code below to see what parameters it takes and what it returns.)
Then, our final code will look like this:
"use client";
import { saveFormDatasToDatabase } from "../actions";
import { useActionState } from "react";
const initialState = {
success: false,
message: "",
};
const Page = () => {
const [state, formAction, pending] = useActionState(
saveFormDatasToDatabase,
initialState
);
return (
<div>
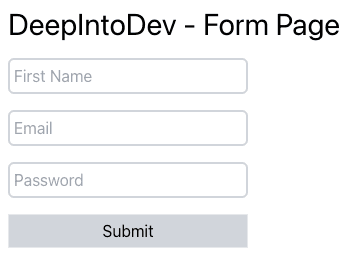
<h1>DeepIntoDev - Form Page</h1>
<form action={formAction}>
<input type="text" placeholder="First Name" name="firstName" />
<input type="text" placeholder="Email" name="email" />
<input type="password" placeholder="Password" name="password" />
<button disabled={pending}>Submit</button>
<p>{state?.message}</p>
</form>
</div>
);
};
export default Page;
And our actions.js:
"use server";
export const saveFormDatasToDatabase = async (_, formData) => {
const rawData = {
email: formData.get("email"),
firstName: formData.get("firstName"),
password: formData.get("password"),
};
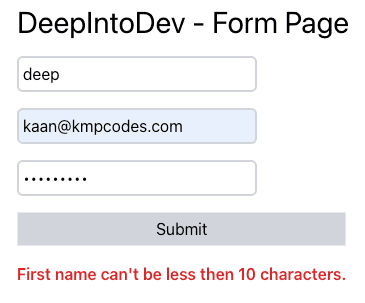
if (rawData.firstName.length < 10) {
return {
success: false,
message: "First name can't be less than 10 characters.",
};
}
};
Note: By passing the server action to useActionState hook, the server action's function signature changes to receive a new initialState parameter as its first argument. But since we don't need that first argument for right now, we simply pass nothing as the first argument, and formData as the second argument.
Thanks to useActionState, now we are able to pass the "state" of the form between frontend and backend. Now we can throw some errors from our backend and receive them on our frontend. It also provides us a pending state, so that while the form is submitting, we can disable the button or even show some kind of a "loading" message to the user.
So useActionState is just a React hook that lets you run a server action and automatically keep track of its returned state. It gives you the current state, a special formAction function to trigger the server action, and a pending value while the action is being submitted.
We’ve successfully added validation to our form, and we’re able to return an error message when that validation fails. Before we move on to adding more detailed, real-world validation with Zod, let’s first solve a problem we’re currently facing.
Preserving Form Input Values
Everything looks good for now. But there is one small problem...
When we submit the form, even though the first name was the only invalid input, we reset all the inputs. So the user has to fill all the inputs again, but they should actually just re-fill the first name area.
So if something goes wrong with one input area, we want to reset only that specific one but keep the rest. How are we going to achieve this?
We know that we can send the "state" of the form from our backend (server action) to our frontend. What we can do is also send the inputs that we got from the frontend.
So now, our server action looks like this:
"use server";

export const saveFormDatasToDatabase = async (_, formData) => {
  const rawData = {
    email: formData.get("email"),
    firstName: formData.get("firstName"),
    password: formData.get("password"),
  };
  if (rawData.firstName.length < 10) {
    const { firstName, ...inputsWithoutFirstName } = rawData;
    return {
      success: false,
      message: "First name can't be less than 10 characters.",
      inputs: inputsWithoutFirstName,
    };
  }
};
When an error happens, we also send the "rawData" that came from the client side, but without the firstName, because we want the user to refill that specific area.
And now our final form element looks like this:
"use client";
import React from "react";
import { saveFormDatasToDatabase } from "../actions";
import { useActionState } from "react";

const initialState = {
  success: false,
  message: "",
};

const Page = () => {
  const [state, formAction, pending] = useActionState(
    saveFormDatasToDatabase,
    initialState
  );
  return (
    <div>
      <h1>DeepIntoDev - Form Page</h1>
      <form action={formAction}>
        <input
          type="text"
          placeholder="First Name"
          name="firstName"
          defaultValue={state?.inputs?.firstName}
        />
        <input
          type="text"
          placeholder="Email"
          name="email"
          defaultValue={state?.inputs?.email}
        />
        <input
          type="password"
          placeholder="Password"
          name="password"
          defaultValue={state?.inputs?.password}
        />
        <button disabled={pending}>Submit</button>
        <p>{state?.message}</p>
      </form>
    </div>
  );
};

export default Page;
We've added defaultValue attributes to every input element so that they will not reset when the form is submitted—unless a specific error occurs in that input field.
Proper Form Validation
So far, we haven't implemented proper form validation in our form. Validation is essential for both the frontend and backend, but as we mentioned before, it should never rely solely on the frontend! This is because client-side validations can be easily bypassed.
For the client side, we could use simple, built-in form validation attributes such as required, minlength, email, etc.
<!-- Email Input -->
  <input type="email" required />

<!-- Address Input -->
  <input type="text" required minlength="10" />

<!-- Phone Input -->
  <input type="tel" pattern="[0-9]{10}" required />
On the backend, we could perform validation using if statements, like this:
export const saveFormDatasToDatabase = async (_, formData) => {
  const rawData = {
    email: formData.get("email"),
    firstName: formData.get("firstName"),
    password: formData.get("password"),
  };
  if (
    !rawData.email ||
    !rawData.password ||
    !rawData.full_name ||
    !rawData.rePassword
  ) {
    return { message: "Please fill all the areas.", inputs: rawData };
  }
  // check email format
  const emailRegex = /^[^\s@]+@[^\s@]+\.[^\s@]+$/;
  if (!emailRegex.test(rawData.email)) {
    return {
      message: "Please enter a valid email address.",
      inputs: rawData,
    };
  }
  if (rawData.full_name.length < 2 || rawData.full_name.length > 50) {
    return {
      message: "Name must be between 2 and 50 characters.",
      inputs: rawData,
    };
  }
};
Note: When there was an error before, we didn’t send the faulty data on the client side, and that field was removed from input element. But now, we’re sending all the data directly. So for example, even if there’s an error in the email field, the input will still keep its value. This is up to your design choice. You can choose either.
However, there are a few issues with this validation approach:
- Limited frontend validation – Relying on basic HTML attributes may not be sufficient for complex validation.
- Messy backend code – Our current validation logic is difficult to manage.
- Inconsistent rules – We might have different validation rules on the frontend and backend. For example, the frontend might allow a firstName up to 50 characters, while the backend enforces a 40-character limit. This inconsistency is a problem.
A Better Solution: Using Zod
One of the best ways to solve these issues is by using a validation library like Zod. With Zod, we can define a single validation schema and reuse it on both the frontend and backend. This ensures we have one source of truth for our validation rules.
Zod also provides built-in validation methods, so we don't need to manually write regex patterns to check if an email is valid, for example.
By implementing Zod, we can make our validation stronger, cleaner, and more consistent across our application.
First, let's install Zod from npm;
npm install zod
Now, since we want to use the same validation rules for both the frontend and backend, we need to create a separate file for our validation rules using Zod. This way, we can use the same validation rules wherever we need it.
Typically, you would have a lib folder in your project for these types of files.
Let’s create a lib folder and add a types.js file inside of it.
lib/types.js:
import { z } from "zod";

export const signUpSchema = z.object({
  firstName: z
    .string()
    .min(2, "First name must be at least 2 characters")
    .max(50, "First name must be maxium 50 characters."),
  email: z.string().email(),
  password: z
    .string()
    .min(8, "Password must be at least 8 characters long.")
    .regex(/[a-zA-Z]/, "Password must contain at least one letter."),
});
You can clearly see how easy it is. We just have created our Zod schema. Now, we can actually use this Zod schema in both our frontend and backend. To verify that the data is reaching the backend as expected, let’s first update our server action like this:
"use server";
import { signUpSchema } from "@/lib/types";

export const saveFormDatasToDatabase = async (_, formData) => {
  const rawData = {
    email: formData.get("email"),
    firstName: formData.get("firstName"),
    password: formData.get("password"),
  };

  const result = signUpSchema.safeParse(rawData);

  if (!result.success) {
    const firstError = result.error.issues[0];
    return {
      success: false,
      message: firstError.message,
      inputs: rawData,
    };
  }
  return { success: true, message: "Data saved successfully", inputs: rawData };
};
We can also perform client-side validation using the same Zod schema. The important point is that we need to validate the form before it's submitted. So the action attribute doesn't work well here because when we use action={formAction}, the form submits immediately on submit, so we can't validate on the client first.
To validate before submission, we have to use onSubmit handler, and call e.preventDefault() to stop the default submission. That's how we can validate the data, and only call the server action if validation passes.
"use client";
import { useState } from "react";
import { saveFormDatasToDatabase } from "./actions";
import { useActionState } from "react";
import { signUpSchema } from "@/lib/types";

const initialState = {
  success: false,
  message: "",
};

const Page = () => {
  const [state, formAction, pending] = useActionState(
    saveFormDatasToDatabase,
    initialState
  );
  const [errors, setErrors] = useState({});

  // To validate with our Zod Schema before we send the form
  const handleSubmit = (event) => {
    event.preventDefault();

    const formData = new FormData(event.target);
    const data = {
      firstName: formData.get("firstName"),
      email: formData.get("email"),
      password: formData.get("password"),
    };

    // Validate with zod schema using safeParse
    const result = signUpSchema.safeParse(data);

    if (!result.success) {
      // If there are errors
      const formattedErrors = {};
      result.error.issues.forEach((err) => {
        formattedErrors[err.path[0]] = err.message;
      });
      setErrors(formattedErrors);
    } else {
      // If validation is correct
      setErrors({});
      // Call formAction with formData
      formAction(formData);
    }
  };

  return (
    <div>
      <h1>DeepIntoDev - Form Page</h1>
      <form onSubmit={handleSubmit}>
        <div>
          <input
            type="text"
            placeholder="First Name"
            name="firstName"
            defaultValue={state?.inputs?.firstName}
          />
          {errors.firstName && <p>{errors.firstName}</p>}
        </div>

        <div>
          <input
            type="text"
            placeholder="Email"
            name="email"
            defaultValue={state?.inputs?.email}
          />
          {errors.email && <p>{errors.email}</p>}
        </div>

        <div>
          <input
            type="password"
            placeholder="Password"
            name="password"
            defaultValue={state?.inputs?.password}
          />
          {errors.password && <p>{errors.password}</p>}
        </div>

        <button disabled={pending}>Submit</button>

        <p>{state?.message}</p>
      </form>
    </div>
  );
};

export default Page;
Now you fully understand how to handle forms in your Next.js application!
Was this blog helpful for you? If so,