How React Works Behind the Scenes
After you complete this article, you will have a solid understanding of:
- How JSX is converted to JavaScript
- The purpose and structure of React Elements
- What rendering means in React
- When components re-render and why
- What is Virtual DOM and Fiber Tree
- How the Virtual DOM and Fiber Tree optimize performance
- How diffing algorithm works
- The reconciliation process that makes React efficient
- How React Works Behind the Scenes
If you’ve worked with ReactJS, you’ve probably heard the words “render” and “re-render” a million times. But have you ever stopped to think about what they actually mean? How does React work behind the scenes? How does it decide when to update the UI and when to stay put? In this post, we’ll dive into the inner workings of React, break down its optimization tricks, and see what really happens under the hood. Let’s get into it!
When you write React code, you probably write JSX. JSX stands for JavaScript XML. It is a syntax extension introduced by ReactJS. Our web applications run on the browser—they run on the V8 Engine if you use Google Chrome, for example—and browsers don't know what JSX is. They only understand JavaScript. So our JSX code needs to be converted to JavaScript first, and for React, Babel handles this process.
How Does Babel Convert JSX to JavaScript?
Babel takes the JSX and convert it to the React.createElement() function. This function returns a JavaScript object called a React Element.
Don't get confused too soon! Don't worry, we'll go through all of this throughout this blog and you'll have a solid understanding of these concepts.
Our main goal is always to get a React Element from JSX. We could skip writing JSX in our codebase and write a bunch of React.createElement() function calls. That would work with no problem. Or you can just write JSX—which is much easier—and let Babel convert your code into React Elements.
What is React.createElement()?
Okay, so now we know we have to call React.createElement() to create our React Element. But what does this function actually do? How does it look? Why is it essential in our React apps?
React.createElement() is the fundamental function used by React to create React Elements. JSX is just syntactic sugar for this function call.
For example, if you write this JSX:
<h1>DeepIntoDev</h1>
It is internally converted to:
React.createElement("h1", null, "DeepIntoDev");
Syntax of React.createElement()
React.createElement(type, props, ...children);
type (element or component):
- If it's a element, it represents a standard HTML tag (h1, p, div...)
- If it's a function or class, it represents a React component.
props (object):
- Attributes like
className,id,onClick, etc. - null means there are no attributes.
...children (optional):
- Content inside the element (text, other elements, or components)
Now, let's start with basic examples, then we will explore more complex scenarios.
JSX:
<h1 className="text-3xl">Deep Into Dev</h1>
Converted to:
React.createElement("h1", { className: "text-3xl" }, "Deep Into Dev");
JSX:
<div>
  <h3 className="text-3xl">Deep Into Dev</h3>
  <span>Deep into React</span>
</div>
Converted to:
React.createElement(
  "div",
  null,
  React.createElement("h3", { className: "text-3xl" }, "Deep Into Dev"),
  React.createElement("span", null, "Deep into React")
);
JSX:
<Card data={cardData} />
Converted to:
React.createElement(Card, { data: cardData });
Note: As we know, children is optional. So if there are no children, then that parameter will be omitted.
Now, let's see a more complex example to understand everything better.
JSX:
function App() {
  return (
    <div className="container">
      <h1>DeepIntoDev</h1>
      <UserCard name="react" age={22} />
      <button onClick={() => alert("Button Clicked!")}>Click Me</button>
    </div>
  );
}

function UserCard({ name, age }) {
  return (
    <div className="card">
      <h2>{name}</h2>
      <p>Age: {age}</p>
    </div>
  );
}
Let's do this step by step. First, let's convert the UserCard component:
function UserCard(props) {
  return React.createElement(
    "div",
    { className: "card" },
    React.createElement("h2", null, props.name),
    React.createElement("p", null, `Age: ${props.age}`)
  );
}
Now, let's convert the App Component:
function App() {
  return React.createElement(
    "div",
    { className: "container" },
    React.createElement("h1", null, "DeepIntoDev"),
    React.createElement(UserCard, { name: "react", age: 22 }),
    React.createElement(
      "button",
      { onClick: () => alert("Button Clicked!") },
      "Click Me"
    )
  );
}
Now, you fully understand how JSX is turned into JavaScript internally. So you could just write React.createElement() function calls in your codebase, or you can write JSX and let Babel turn your code into JavaScript—which is easier and less complex.
Output of React.createElement()
Okay. We know JSX is turned into React.createElement() function calls, but what do these function calls return?
These function calls return a plain JavaScript object, and this object is called React Element.
React.createElement(type, props, ...children);
It returns an object like this:
{
    type:"",
    props:{},
    key:"",
    ref:""
}
Note: Inside the props object, you will get both
props(attributes like className, onClick, or id...) andchildren.
Let's look at an example:
const element = React.createElement(
  "h1",
  { className: "title" },
  "DeepIntoDev"
);
console.log(element);
Output will be:
{
  type: "h1",
  props: {
    className: "title",
    children: "DeepIntoDev"
  },
  key: null,
  ref: null,
  _owner: null,
  _store: {}
}
Note: In server components in NextJS, the output might be slightly different. But it's mostly the same in client and server components. For example, you won't see
refin a server component if you call this function in a server component.
Breaking Down the Output
- type: "h1" → This tells React that this element is an
<h1>tag. - props → This contains the attributes (like className, onClick, or id...) and child elements. Children is the content inside of the
<h1>tag. - key → If you've ever rendered a list with the
map()function, then you've probably seen this. Key is essential in some cases. We will see an actual use-case ofkeyin this blog. You will also learn whykeyprop is so important in React. - ref → Ref is used to directly access and interact with the DOM. If you've ever used the useRef() hook, then you know this.
- _owner → This property is used by React for tracking which component is responsible for creating an element during debugging. It helps React determine the source of errors in development mode. Usually not accessed directly in application code.
- _store → Another internal React property used for storing metadata about the element. Can contain information about validation, warnings, etc.
Let's see in example.
JSX:
<div id="container">
  <h1>DeepIntoDev</h1>
  <p>Welcome to React</p>
</div>
Converted to React.createElement function call:
const element = React.createElement(
  "div",
  { id: "container" },
  React.createElement("h1", null, "DeepIntoDev"),
  React.createElement("p", null, "Welcome to React")
);
console.log(element);
Output will be:
{
    type:"div",
    props:{
        id:"container",
        children:[
            {type:"h1",props:{children:"DeepIntoDev"},key:null,ref:null},
            {type:"p",props:{children:"Welcome to React"},key:null,ref:null}
        ]
    },
    key:null,
    ref:null
}
Now, we understand the entire process from writing JSX code to converting it to a React Element.
This was important to understand because we will always see and use the term of React Element in this blog, and now you know where it comes from.
What Exactly Does Rendering Mean in React?
After you trigger a render, React calls your components to figure out what to display on screen. So “Rendering” basically means React calling your components.
Rendering is of two types:
- Initial Rendering – When your React app first loads, React creates the UI for the first time.
- Re-rendering – When state or props change, React updates only the necessary parts of the UI efficiently. (We will see in detail about how this works)
How Does Initial Rendering Happen?
If you have a ReactJS app, then go to index.jsx/main.jsx to see code similar to this:
function App() {
  return <h1>DeepIntoDev</h1>;
}
const root = ReactDOM.createRoot(document.getElementById("root"));
root.render(<App />);
Steps that happen on initial Render:
1.Entry Point in HTML
First, in your index.html file, you have:
<div id="root"></div>
This is the empty DOM container where your React application will be mounted.
2.Creating the Root
const root = ReactDOM.createRoot(document.getElementById("root"));
document.getElementById("root") finds that empty div in your HTML.
ReactDOM.createRoot() creates a React root instance connected to this DOM node.
This establishes the connection between React and the browser DOM.
3.Rendering the App
root.render(<App />);
This initiates the rendering process.
4.Component Execution
function App() {
  return <h1>DeepIntoDev</h1>;
}
React calls your App function component.
App returns JSX: <h1>DeepIntoDev</h1>
5.JSX Transformation: React transforms the JSX into React elements:
{
  type: "h1",
  props: { children: "DeepIntoDev" },
}
This is a JavaScript object representation of your UI.
6.Virtual DOM Creation: React takes these element objects and constructs a complete tree called the Virtual DOM.
- This is a lightweight representation of your UI in memory
- It's made up of the element objects from the previous step (We will see why React doesn't directly modify the real DOM, but creates a Virtual DOM and compares it with the real DOM.)
7.Initial DOM Updates: React calculates what DOM operations are needed (for initial render, it's creating all elements). ReactDOM creates the actual DOM nodes:
<h1>DeepIntoDev</h1>
8.Render Complete: The browser displays your rendered React application. This sequence is what happens specifically during initial rendering.
In a large application, there are thousands of components, so we end up with a massive JS Object in a tree-like structure. Constructing a DOM from this huge JS object takes a lot of time. But React only constructs the DOM from scratch at the first time.
You may have noticed that when you build your React app for the first time, it takes a while. But in subsequent renders/re-renders, it doesn't take as much time. This optimization is due to the "Virtual DOM" and "reconciliation" algorithms.
We will study Virtual DOM and Reconciliation in detail in this blog.
First, let's see what re-rendering is, and when does a component re-render?
What is Re-rendering, and When Does a Component Re-render?
Re-rendering in React is the process where a component updates and executes again to reflect changes in the UI. However, not every change triggers a re-render — React is optimized to only re-render components when necessary.
A component re-renders when:
- Its State Changes (useState)
- Its Props Change (Parent component passes new props)
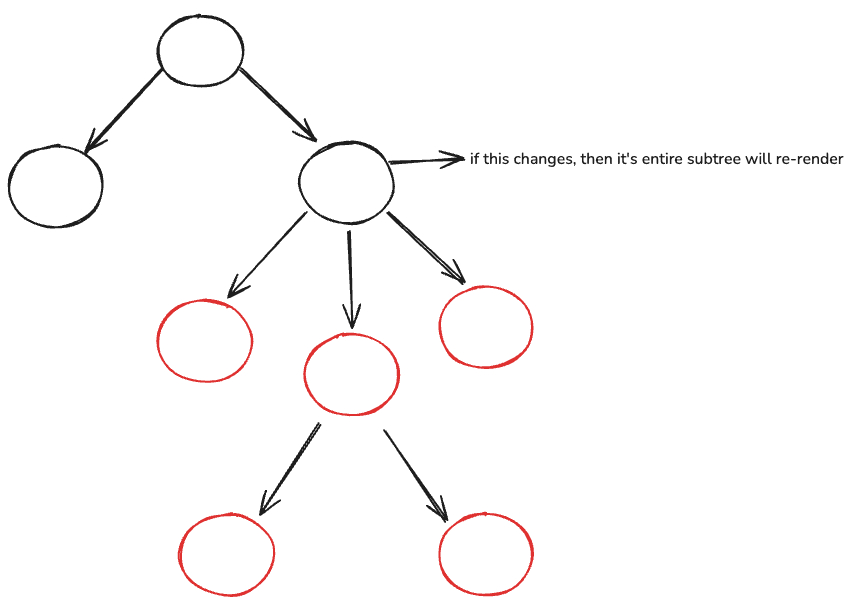
- Its Parent Re-Renders (Even if props don't change)
Re-Rendering Due to State Changes
A component will re-render when its state is updated using useState.
import React, { useState } from "react";

function Counter() {
  const [count, setCount] = useState(0);

  console.log("Counter Re-Rendered!");

  return (
    <div>
      <button onClick={() => setCount(count + 1)}>Increment</button>
    </div>
  );
}

export default Counter;
Here, whenever the button is clicked, the count state will change and the component will re-render to show the latest change.
Re-Rendering Due to Props Change
function Parent() {
  const [count, setCount] = useState(0);

  return (
    <div>
      <Child count={count} />
      <button onClick={() => setCount(count + 1)}>Increment</button>
    </div>
  );
}

function Child({ count }) {
  console.log("Child Re-Rendered!");

  return <h1>Count: {count}</h1>;
}

export default Parent;
If you click on the button then the count state will change. It will re-render the Parent (due to the first rule) and also re-render the Child because Child receives count as props. Whenever the props that a component takes as an argument change, the component re-renders.
Re-Rendering Due to Parent Re-Rendering
Even if a child's props don't change, it will still re-render if its parent re-renders.
function Parent() {
  const [count, setCount] = useState(0);

  console.log("Parent Re-Rendered!");

  return (
    <div>
      <button onClick={() => setCount(count + 1)}>Re-Render Parent</button>
      <Child />
    </div>
  );
}

function Child() {
  console.log("Child Re-Rendered!");
  return <h1>Hello</h1>;
}

export default Parent;
If you don't want the Child to re-render in this case, then you can wrap the Child in React.memo(). It will prevent re-rendering in this condition. It will only re-render based on the first and second conditions.
You may be wondering, if we don't use React.memo() and the entire subtree re-renders whenever any component re-renders, then wouldn't our app be too slow?
ReactJS is very clever. It uses Virtual DOM and Reconciliation to optimize performance. We will study these in the next section of this blog.
React 18+ Strict Mode Double Rendering
In React 18+, components inside <React.StrictMode> re-render twice in development mode to detect side effects.
import React from "react";
import ReactDOM from "react-dom";

function App() {
  console.log("Component Rendered!");
  return <h1>Hello</h1>;
}

ReactDOM.createRoot(document.getElementById("root")).render(
  <React.StrictMode>
    <App />
  </React.StrictMode>
);
In development mode, you'll see "Component Rendered!" twice in the console. This doesn't happen in production, so it's safe to ignore it.
Understanding Virtual DOM
The Virtual DOM (V-DOM) is a lightweight copy of the real DOM that React maintains in memory. It allows React to efficiently update the UI without directly modifying the real DOM on every change.
But why do we even need a virtual DOM? Why don't we just directly modify the real DOM?
That is a great question. Here's why:
-
The real DOM is slow for frequent updates: When you make changes to the real DOM, it often triggers reflows and repaints of the webpage, which are computationally expensive operations. If you're building a dynamic application with many UI changes, directly modifying the DOM for each change would significantly slow down your application.
-
Updating the real DOM is expensive: The DOM is a complex tree structure. When you update one element, the browser needs to recalculate styles, layout, and sometimes re-render large parts of the page. This process consumes CPU resources and can cause noticeable delays.
-
React's efficient batching of updates: React's virtual DOM acts as a lightweight copy of the real DOM. When your application's state changes, React first updates this virtual copy. Then it compares the updated virtual DOM with the previous version (a process called "diffing"—we will see in this blog about what diffing is) to identify exactly which parts of the real DOM need to change. This way, React only makes the minimum necessary changes to the real DOM.
How Does Virtual DOM Work?
Before we dive deep into how Virtual DOM works, let's clarify some concepts further. Trust me on this, the more we repeat, the clearer you'll understand!
We know about how we get React elements.React elements are just objects that are returned by React.createElement() function calls. We've explored many examples, so we have no question about this.
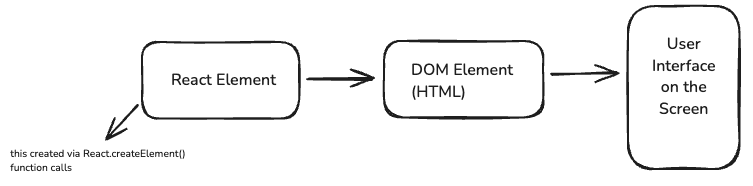
Now, we have to figure out how this React Element will turn into an actual DOM Element.
On initial render, after we create our "React Elements," React will create a Virtual DOM with all of these "React Elements." (As we saw above in Step 6 → Virtual DOM Creation)
So Virtual DOM is basically a "Tree of all React elements you have."
Note: Virtual DOM is also called "React Element Tree."
After a brand new virtual DOM is created, the Current Fiber Tree and our created Virtual DOM will go through Reconciliation and Diffing. And after these algorithms, we get our new Updated Fiber Tree.
Wait... WHAT? Where did "Fiber tree" come from? What is Reconciliation or diffing?
I know it looks confusing. But let's go step by step. We will understand all of these concepts in this blog.
Understanding Fiber Tree
Fiber tree is React's internal implementation that was introduced in React 16. The Fiber tree is built based on the Virtual DOM, but contains additional information that React needs for its reconciliation process.
To clarify the relationship:
- You write components that return JSX
- React converts this JSX into React elements (Virtual DOM)
- React uses these elements to build its internal Fiber tree
The Virtual DOM is more of a conceptual model that developers interact with, while the Fiber tree is the specific implementation that powers React's internal algorithms.
So, think of the Fiber tree as "Virtual DOM with superpowers."
What are those superpowers? What makes the Fiber tree different from the Virtual DOM? What are the actual differences?
-
Purpose
- Virtual DOM: A lightweight representation of the DOM, designed to improve performance by minimizing direct DOM manipulations
- Fiber Tree: An internal data structure that implements React's reconciliation algorithm with advanced scheduling capabilities
-
Structure
- Virtual DOM: A simple tree of React elements (JavaScript objects)
- Fiber Tree: A linked list structure that enables incremental rendering and holds additional metadata
-
Capabilities
- Virtual DOM: Basic diffing and minimal DOM updates
- Fiber Tree: Work prioritization, incremental rendering, time-slicing, and the ability to pause and resume work
-
Implementation
- Virtual DOM: A conceptual model that React has used since its introduction
- Fiber Tree: Introduced in React 16 as a complete rewrite of React's core algorithm
-
Exposure to Developers
- Virtual DOM: A concept that developers interact with via JSX/React.createElement
- Fiber Tree: An internal implementation detail not directly exposed to developers
-
Rendering Process
- Virtual DOM: Single-pass, synchronous rendering
- Fiber Tree: Supports asynchronous rendering with the ability to split work into chunks
-
Memory Representation
- Virtual DOM: Simple objects representing UI elements
- Fiber Tree: Contains additional fields for tracking state, effects, priorities, and alternate versions
-
Relationship to Components
- Virtual DOM: Direct output of component render methods
- Fiber Tree: Maintains references to component instances and their state
The Fiber Tree essentially powers React's more advanced features while maintaining the conceptual simplicity that the Virtual DOM provided to developers.
Understanding Reconciliation and Diffing Algorithms
Reconciliation: The overall process React uses to update the UI following data changes. This involves comparing the newly rendered Virtual DOM with the previous Fiber tree, and applying only the necessary changes to the real DOM. "Only the necessary" part is important here, because reconciliation's goal is to update the real DOM by minimizing changes.
Diffing: A part of the reconciliation process - the algorithm that compares previous and new trees to determine the differences between them.
Let's be more clear about the terminology here:
- Rendering: Creates the Virtual DOM tree.
- Reconciliation: Process of figuring out what changed in the Virtual DOM.
- Diffing: A specific part of the reconciliation process.
Don't get too confused with Reconciliation here. At the end of this blog, we will make a very clear recap, and you will understand what the Reconciliation process actually includes. But for now, let's examine what diffing really is and how it compares two different trees. There are some "real world" scenarios that you need to be aware of.
How Diffing Works
Diffing is basically a part of reconciliation process. It compares elements step by step, based on their positions in the two trees we have (current Fiber tree and new Virtual DOM).
So we essentially look at the "positions of elements" between two renders.
Diffing uses 2 fundamental rules:
First Rule of Diffing Algorithm:
Two elements of different types will produce different trees. ("Different trees" means different subtrees in the Virtual DOM/Fiber structure)
I know it doesn't mean anything to you right now. But let's understand what does it actually mean. It's actually very simple.
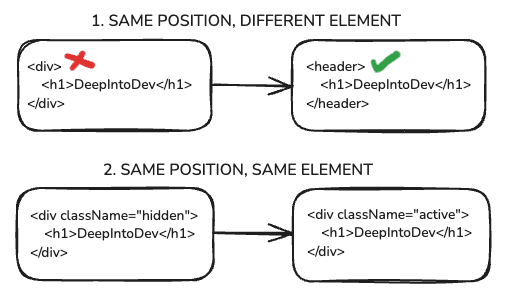
When React notices that an element's type at a particular position has changed (for example, from a <div> to a <span>), it doesn't bother trying to reconcile or update that element or any of its children. Instead, it considers the entire subtree rooted at that position to be completely different.
As a consequence:
- React will completely remove the old subtree from the DOM (so their state will also be removed too! This is important, because if elements are kept in the tree, that means their state will be kept too. But if it's removed then its state is removed as well.)
- React will create a completely new subtree for the DOM.
This is a performance optimization. React assumes that if the root element type changed, then likely everything beneath it changed too, so it's faster to just rebuild that entire portion rather than trying to figure out which parts might be the same.
But what if React doesn't see a different element in the same position, but the same element? For example, what if it sees a <div> again, but with just a different prop? Let's say at first it was <div className="hidden"> and now it is <div className="active">.
In this case:
- The element will be kept in the tree (as well as its child elements and its state).
- New props/attributes are passed if they changed between renders.
To make everything clear, let's see examples of these possible situations.
As we mentioned earlier, "if an element's position is the same, and 'that' element isn't a different element," it will be preserved in the DOM. This means its state will not reset. This principle has significant implications in real-world applications.
Note: When we say "an element is kept in the DOM," we're also saying that its state is preserved. This happens because Fiber nodes contain or reference the component's state as well.
Let's examine how this looks in a practical example:
Consider the following code:
"use client";
import { useState } from "react";

const Tab = ({ content, tabNumber }) => {
  const [hideContent, setHideContent] = useState(false);
  return (
    <>
      <h1>{tabNumber}</h1>
      {!hideContent && <p className="font-semibold text-lg">{content}</p>}
      <button onClick={() => setHideContent((curr) => !curr)}>
        {hideContent ? "Show Content" : "Hide Content"}
      </button>
    </>
  );
};

const Page = () => {
  const [tab, setTab] = useState(0);
  return (
    <div>
      <Tab
        tabNumber={tab}
        content={
          tab === 0
            ? "This is the first tab that we will render"
            : "This is the second tab that we will render"
        }
      />
      <button onClick={() => setTab(tab === 0 ? 1 : 0)}>Change Tabs</button>
    </div>
  );
};

export default Page;
The initial rendering appears like this:
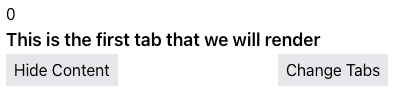
Now, let's hide the content by clicking the "Hide content" button:

Next, let's change the tab by clicking the "Change tabs" button:

Do you notice what happened? Our content remains hidden. This shows that the state is "preserved," which occurs because it's the "same position, same element." Therefore, the element persists in the DOM along with its states. However, this isn't something that we always want. We actually want to "reset" the state even when it's the "same position, same element."
How can we achieve this reset behavior?
This is where the second rule of React's diffing algorithm comes into play:
Elements with a different key prop do not remain the same across renders. And, elements with a stable key prop maintain their identity across renders.
What is the key prop?
The key prop is a special property that we use to inform the diffing algorithm that an element is unique. It allows React to distinguish between multiple instances of the same component type. When the key changes between renders, the element will be destroyed and a new one created (even if its position in the tree remains unchanged).
Let's modify our Tab component by adding a key prop:
<Tab
  tabNumber={tab}
  content={
    tab === 0
      ? "This is the first tab that we will render"
      : "This is the second tab that we will render"
  }
  key={tab}
/>
Try this implementation yourself, and you'll observe that when we hide the content and then change the tab, the content won't be hidden in the new tab. This occurs because the state resets, thanks to the key prop. React now recognizes that these are two distinct components, even though they occupy the same position across renders.
There's also a second use case for the key prop:
When a key value remains consistent across renders, the element will be preserved in the DOM (even if its position in the tree changes). This is actually why we use the key prop in lists. In fact, it's a requirement to avoid unnecessary re-renders and unexpected UI behaviors.
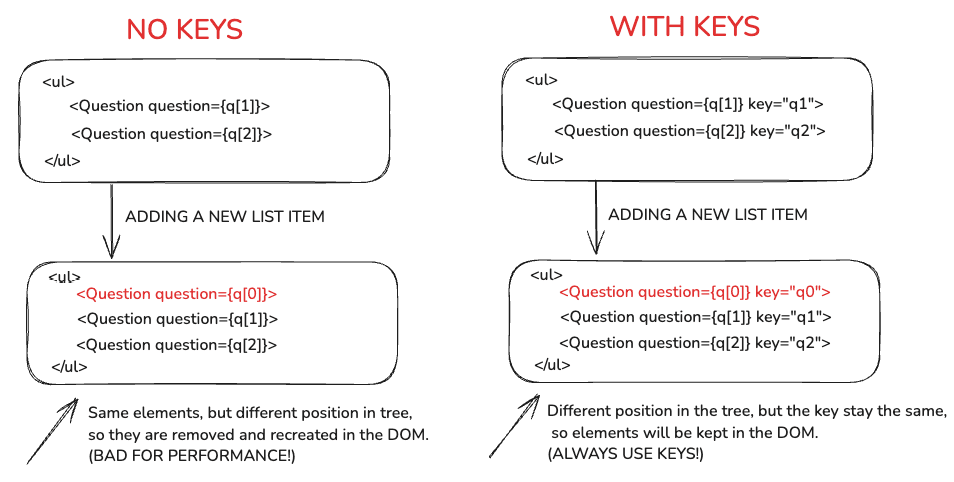
Note: Key values must be unique!
So now you understand there are two primary use cases for the key prop:
-
Using keys in lists: When a key remains unchanged across renders, the element is preserved in the DOM (even if its position in the tree changes).
-
Using keys to reset state: When a key changes between renders, the element is destroyed and recreated (even if its position in the tree remains unchanged).
We've covered numerous concepts about React's internal mechanisms. Let's now recap everything we've learned so far and introduce a few additional terms to provide you with a comprehensive understanding of how React operates behind the scenes.
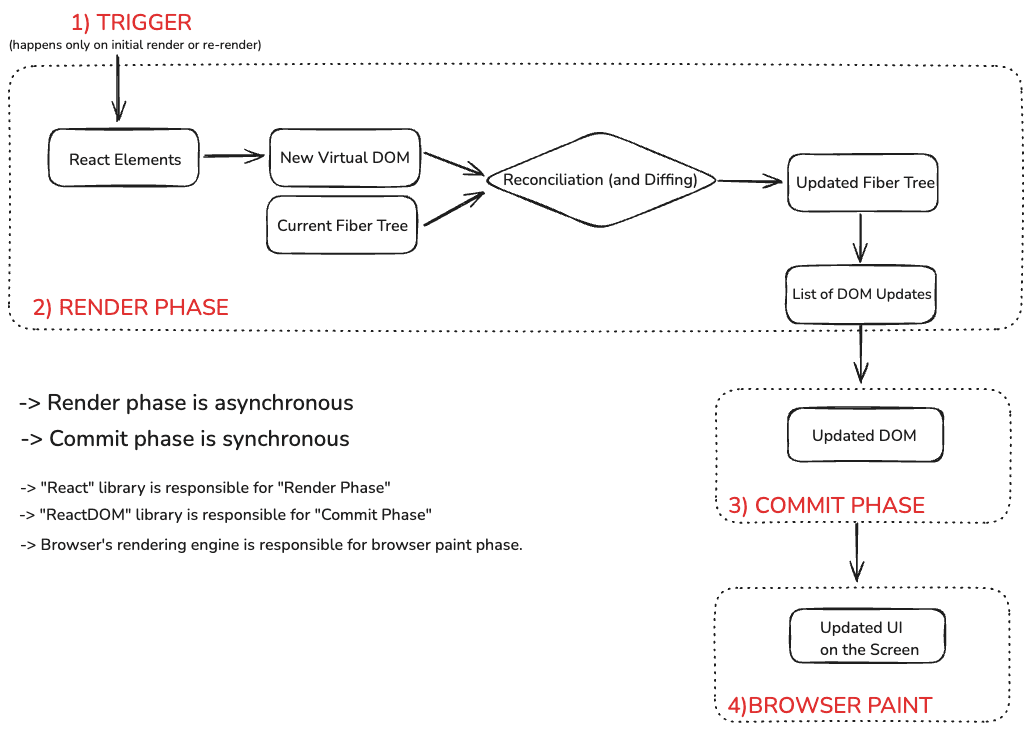
Note: We referred to an "updated fiber tree" in the image above because, rather than creating entirely new tree structures for each update, React efficiently modifies the existing Fiber tree. During the update process, React creates new Fiber nodes where necessary and reuses existing ones when possible. This approach is significantly more memory-efficient than generating a completely new tree structure for every update.
Let's analyze this illustration further:
After updating the Fiber tree, React generates a list of DOM updates that need to be applied.
This list can be called an "effect list." It contains all the required DOM operations:
- Nodes to create
- Nodes to delete
- Properties to update
- Event listeners to add/remove
- And so on
The creation of this list marks the conclusion of the "render phase." Subsequently, this list is passed to the "commit phase."
We haven't explicitly discussed the "render phase" and "commit phase" in detail, but they simply refers to different stages in React's update process. The "render phase" was everything we've discussed so far.
The final stage is the "commit phase"—which we haven't discussed yet. During this phase, React writes to the DOM: performing insertions, deletions, and updates. (These DOM update operations are executed on the browser's actual DOM.)
The commit phase is synchronous: the DOM is updated in a single, uninterruptible operation. This synchronous behavior is essential to ensure the DOM never displays partial results, thereby maintaining a consistent UI (always in sync with the application state).
Note: While the render phase can be asynchronous, the commit phase is strictly synchronous!
After the commit phase completes, the fiber tree becomes the current tree for the next render cycle.
The browser paint phase is a process that the browser's engine will execute after receiving the "Updated DOM."
Important clarification: The React library itself isn't involved in the commit phase. React only handles rendering during the Render phase and doesn't dictate where the results will be applied. The component that writes the results to the actual DOM is a library called ReactDOM. This is why we must include ReactDOM in our projects. For instance, you can also develop mobile applications using React Native with what React renders. Therefore, it's more accurate to refer to the structure as a "React Element Tree" rather than Virtual DOM. After all, this tree isn't exclusively used for DOM operations—it's utilized by whichever library we're working with during the commit phase.
That was a substantial amount of information! But let me recap the entire pipeline ONE MORE TIME! Yes, you read that correctly... one final time. This summary is designed to enhance your understanding:
Complete React Rendering Pipeline
-
Render Phase:
- Component rendering (calling component functions/render methods)
- Virtual DOM creation
- Reconciliation (with diffing):
- Tree comparison
- Element type checking
- Props comparison
- Children reconciliation
- Creation of a list of updates needed
-
Commit Phase:
- DOM node creation for new elements
- DOM node removal for deleted elements
- Property and attribute updates on existing DOM nodes
- Event listener attachment/detachment
- Reference updates
- Lifecycle method calls (componentDidMount, componentDidUpdate, useLayoutEffect)
I believe you now have a solid understanding of how React functions behind the scenes.
Was this blog helpful for you? If so,